ПЕРЕД ТЕМ КАК ЧТО-ЛИБО ПОДТВЕРЖДАТЬ
- Подключение кошелька само по себе не выполняет действий
- Подключение кошелька не перемещает средства
- Подключение кошелька не даёт разрешение на торговлю
- Ответственность за подтверждения остаётся на пользователе
Перед тем как нажимать кнопки
Подключение кошелька задает, как система будет распознавать вас и запрашивать подтверждения в будущем. Это настройка доступа: интерфейс понимает, к какому адресу обращаться и где запрашивать будущие подтверждения. Само по себе это не торговое действие.
Ваш кошелек = ваш аккаунт
На Hyperliquid вы не создаете обычный аккаунт: вашим аккаунтом становится кошелек.
Это значит:
- вы полностью контролируете свои средства
- восстановления пароля нет
- транзакции нельзя отменить
Если вы потеряете доступ к кошельку, вы потеряете доступ к средствам.
Это не обычный логин и не перенос ответственности на систему.
Кнопка Connect wallet

Когда вы нажимаете Connect, вы просто выбираете кошелёк, с которым будет работать Hyperliquid. Это ещё не подтверждение сделки и не разрешение двигать средства.
На этом этапе:
- вы ещё ничего не подписали
- вы ещё не дали разрешение на действия с кошельком
Экран: выбор кошелька
На этом экране вы выбираете, как подключиться к Hyperliquid: через email или через внешний кошелёк. Это ещё не сделка, не депозит и не разрешение двигать средства.
Вы просто выбираете способ доступа, через который будете подтверждать будущие действия.
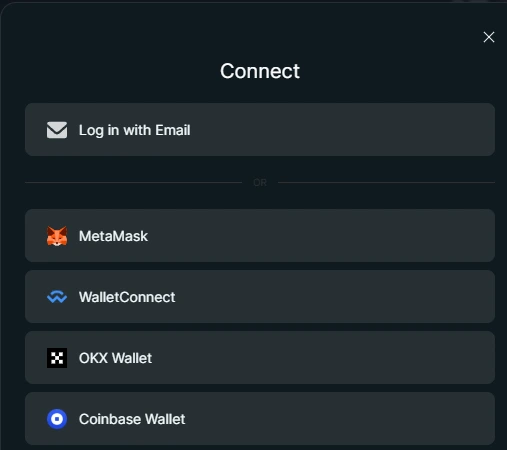
Выбор кошелька сам по себе не перемещает средства. Любое действие с деньгами потребует отдельного подтверждения.
Сравнение способов доступа
В интерфейсе может встречаться слово “account”, но это не кастодиальный аккаунт в стиле Binance. Это способ сохранить вашу сессию и состояние интерфейса, а не место, где платформа хранит ваши средства.
Выберите способ входа
Выберите, как хотите подключиться к Hyperliquid: через email или через внешний кошелёк.
- Доступ через email — самый простой вариант для новичка. Кошелёк создаётся автоматически, без установки MetaMask.
- Доступ через кошелёк — вариант для тех, кто уже пользуется MetaMask, Rabby или другим кошельком.
Пока вы только выбираете способ входа. На этом этапе:
Что важно понять
- вы ещё не открываете сделку
- вы ещё не перемещаете средства
- любое действие с деньгами всё равно потребует отдельного подтверждения
Главная мысль
Подключение кошелька — это не разрешение на действия. Это только способ войти в интерфейс и выбрать, как вы будете подтверждать действия дальше.
Доступ через email
Email login — самый быстрый способ начать, если вы ещё не пользуетесь отдельным кошельком.
Когда вы вводите email, Hyperliquid создаёт для вас способ доступа, чтобы интерфейс мог запомнить вашу сессию и показывать состояние аккаунта.
Каждое важное действие позже всё равно потребует отдельного подтверждения.
Введите email
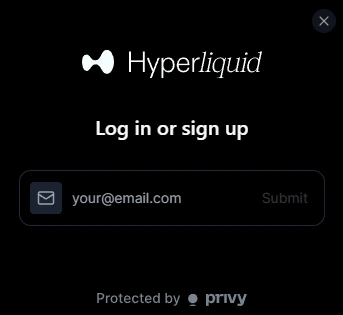
Этот экран завершает настройку доступа через email.
После этого вы можете перейти к пополнению.
Что происходит на этом шаге
Доступ через кошелёк
Доступ через кошелёк означает, что интерфейс подключается напрямую к кошельку, который вы контролируете.
Подтверждения проходят через подписи в кошельке, а не через аккаунт, которым управляет сайт.
Рекомендуемый кошелёк для этого гайда: MetaMask.
Сохраните recovery phrase в безопасности
Когда вы создаёте кошелёк, вы получаете recovery phrase — фразу восстановления, обычно 12 слов.
Это единственный способ восстановить доступ к вашему кошельку.
- Никому её не показывайте
- Не храните её онлайн
- Запишите её и храните в безопасном месте
Экран: подтверждение подключения кошелька

В этом примере выбран MetaMask. Этот экран подтверждения относится к вашему кошельку, а не к Hyperliquid. Подтверждение этого запроса только подключает адрес кошелька к интерфейсу. Оно не подтверждает сделки, не перемещает средства и не выдаёт разрешение на списание.
Самый быстрый способ начать
Если хотите пропустить ручную настройку, можно войти через email: кошелек будет создан автоматически.
Позже его можно экспортировать в обычный кошелек.
Следующий шаг
На этом настройка доступа завершена. Следующий шаг - перевести средства в торговую среду.