Before you deposit anything
- Depositing is a real on-chain action
- You transfer funds to your Hyperliquid trading balance
- Funds become available only after the deposit is confirmed
- Responsibility for the network, address, and amount stays with you
What this step does
Depositing moves USDC from your wallet to your Hyperliquid trading balance.
Until the deposit is complete, you can connect a wallet and explore the interface, but you cannot open positions.
When the deposit is confirmed, funds become available for trading.
Hyperliquid uses USDC
Even if you deposit other assets through built-in funding methods, they need to become available as USDC in the trading interface.
The simplest path is to fund your balance directly in USDC.
Use the correct network
Make sure you send funds through a supported network, such as Arbitrum One.
If you choose the wrong network or address, funds can be delayed or lost.
Once the network, address, and amount are checked, you can continue to the deposit flow.
Step 1 - Open deposit screen
Screen: Deposit entry point

Deposit button in UI
The deposit flow starts from the interface. You open the deposit panel to define what asset you want to transfer and from which chain.
This step does not move funds yet - it prepares the transaction.
Step 2 - Choose asset and network
Screen: Deposit form
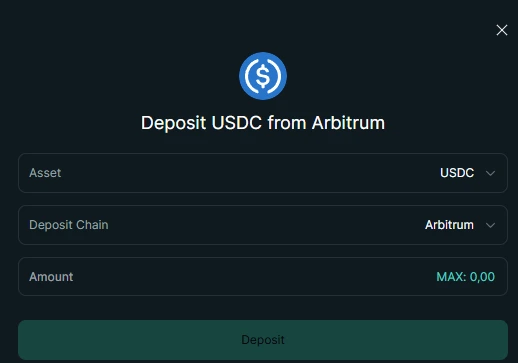
Before confirming, select the asset, network, and amount.
For Hyperliquid trading, USDC is usually used, and one common network option is Arbitrum.
The important part is that the network in the deposit form matches the network you are sending funds from.
If you choose the wrong network or asset, the deposit may not arrive automatically. Before sending, check the asset, network, and amount.
Simple option: deposit by card
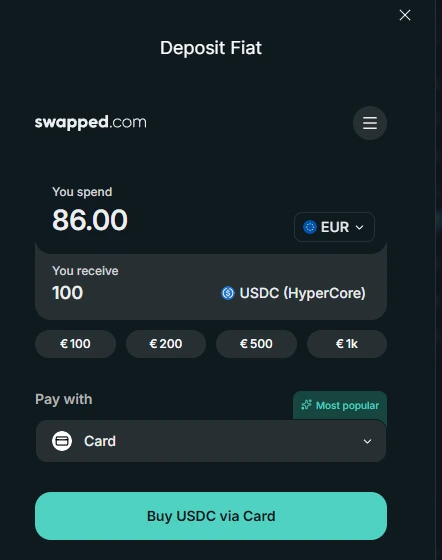
Buy USDC by card directly from the deposit screen.
Buy USDC by card directly from the deposit screen.
This is the simplest path for beginners: you receive USDC on Arbitrum, which is suitable for funding Hyperliquid.
If your funds are already on another network, you need to move them to Arbitrum first.
Step 3 - confirm the deposit transaction
Screen: Wallet confirmation
This step applies to wallet deposit, for example through MetaMask. It does not apply to the card purchase flow.
Wallet transaction confirmation
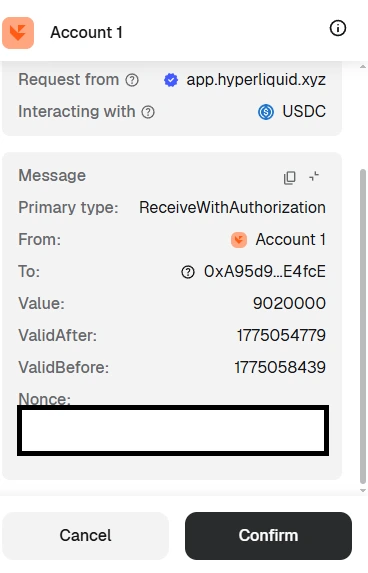
This is the point where you actually send the deposit transaction from your wallet.
To confirm the deposit, keep a small amount of ETH on Arbitrum for network gas fees. Without ETH on Arbitrum, your wallet will not be able to send the transaction.
At this stage, your wallet will ask you to confirm the action.
First-time approval
The first time you deposit USDC, you may need to approve USDC first.
This is a separate one-time approval that allows the contract to process your USDC deposit.
After that, you confirm the actual deposit transaction.
This is where the transfer happens. Once confirmed, it cannot be undone.
After confirmation:
- Funds leave your wallet
- The transaction is sent to the network
- Hyperliquid waits for the deposit to be recognized
Step 4 - Funds become available
Screen: Updated balance
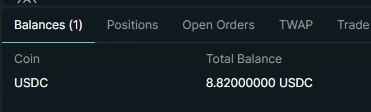
After the transaction is confirmed, your deposit appears in your available balance.
After the transaction is confirmed, your deposit appears in your available balance.
At this point:
- funds are available inside Hyperliquid
- they can be used as collateral
- trading becomes available
There is no additional approval step after this.
Where your funds go
After depositing, your funds become available for trading on Hyperliquid.
You still control them and can withdraw them back to your wallet at any time.
How to think about deposits
A deposit is not just a transfer of funds.
It is the moment your USDC becomes available inside Hyperliquid and can be used for trading.
Before the deposit, your USDC is only in your wallet. After the deposit, it becomes part of your Hyperliquid balance and determines what positions you can open.
Hyperliquid does not hold funds like a traditional centralized exchange. Your balance reflects the state of the system, not a record in a company internal database.
Hyperliquid deposit vs typical exchange deposit
Main idea
A deposit defines what you can do on Hyperliquid: without funds on your balance, you cannot open a position; when the deposit is confirmed, funds become available for trading immediately.
Reinforcement
Deposits follow the same logic as other actions in the system:
- an action changes state directly
- availability depends on on-chain confirmation
- there is no manual layer that processes or reverses the deposit for you
Once the deposit is recognized, funds can be used immediately.
You can move on when
- You understand how USDC reaches your Hyperliquid balance
- You can explain when a deposit becomes available
- You remember that a confirmed deposit cannot be reversed
Common mistakes
- send funds on the wrong network
- not leave a small amount of ETH for the network fee
- deposit an amount too small for normal trading
Next step
Now you are ready to open your first trade.